Saturday, March 30, 2013

I'll die with a varnish brush in my hand

Took the winches off the teak cap rail and am rebuild them at home. Since they were off, I decided to strip and varnish the wood.


Saturday, March 23, 2013

Nothing is easy on a boat


I am trying to update the boat but not spend so much money that I have nothing left to go to Mexico with.  I bought this bilge pump and it fits perfectly and even pumps the water out and a good rate.

 
This pump is good for 1100 gpm in a perfect world.  Appa is not a perfect world.  The bilge pump hose that runs to the back of the boat for the automatic bilge pump is 3/4".  The hand pumps are over 1", look to be 1 1/2" diameter.  This pump has a 1 1/8" outlet which I had to buy an adapter for.  Vetus makes one that is pretty slick.  So that job is more or less done.  The wiring is waterproof and logical (for me).  Just have to hard mount the bilge pump.

My next project is tearing the wiring out at the engine control panel.  I'll leave the wiring harness for the engine alone but there is a mess of wires coming into the panel with no discernible reason.  I'm tearing that out and running new wiring.  Why do people run wires like this?  
There just ain't any reason for this!  This area is almost open to the elements.  Not a single wire is protected from moisture!
The blower motor runs up to this point so it turns on with the ignition switch.  Unnecessary IMO.  I'll make a switch that has to be flipped at the main control panel.  The blower motor have a finite lifespan.  It does not need to be on the whole time the engine is running.  Going to keep it simple back there.  All these connections can corrode and that's not good.  The fuel gauge has three separate wires running to it.  Power for the light, sending unit and the other I'm not sure.  These aren't single wires either.  They are duplex wires with one of the wires cut short and taped.  Again WTF!?!  Just typing about this pisses me off.  Grrrr. 

Here is a better shot.  The grey tubes are the duplex wiring.  The big red wires are for the windlass control.  I fixed those.  The wires in the terminal box are just hanging there, barely.
I got more TeakGuard and will hit the decks once this weather stops being so....Bipolar.  Snowed yesterday.  
Mexico is looking more and more like it's really going to happen.  My step-son Max's father now knows about our plan and is being very open minded about it.  He even wants to help with the delivery to California.  
Chris Tutmark stopped by the boat and is going to give me a quote on new lifelines and new standing rigging.  We'll drop the mast for that.  Paint the bottom and change all the through hulls while we are at it.  $$$$.  Once done though, we will be good for the trip.

Monday, March 11, 2013

Ta-freaking-da

After unimaginable toil and suffering on this damn deck it is truly almost done.  If I didn't run out of TeakGuard, I'd be finished!!  What a job this was.  The splotchy spots need another coating.  Actually the decks need another two coats.  I did the area around the mast and the Starboard deck three times.  It looks a little bit like plastic teak.  Great nonskid properties.  Here is the anchor locker with four coats on it.  Not sure about the color but really, I don't give a shit.  Just protect the deck so I don't have to mess with it for a while.
The lighter area needs two more coats.  Hopefully this stuff works.  I have some touch up spots on the caulking.  Amazing what you see when you get up close and paint something.  I missed all sorts of bungs and the like.  Had to stop multiple times and drill and fill holes.  Some areas are too far gone for anything so I filled them with this flexible epoxy and covered that with the TeakGuard and supposedly that will help keep the UV from damaging the epoxy.  The teak is glued down so securely that I can't replace individual board without tearing up everything around the bad board.  Collateral damage I suppose you could call it.  Screw it! 
I got stopped a couple times by people on the dock as they were walking by.  They all commented on how great it looks.  Here is a shot of what they did look like.


Don't let the nice silver look fool you.  Underneath all that silver decking is thousands of screws that are begging for release.  Mold is everywhere on this deck.  Eating the wood slowly.

See all the dark splotches?  Mold.  Eating my teak.  Die mold!  DIEEE!!!!!!!

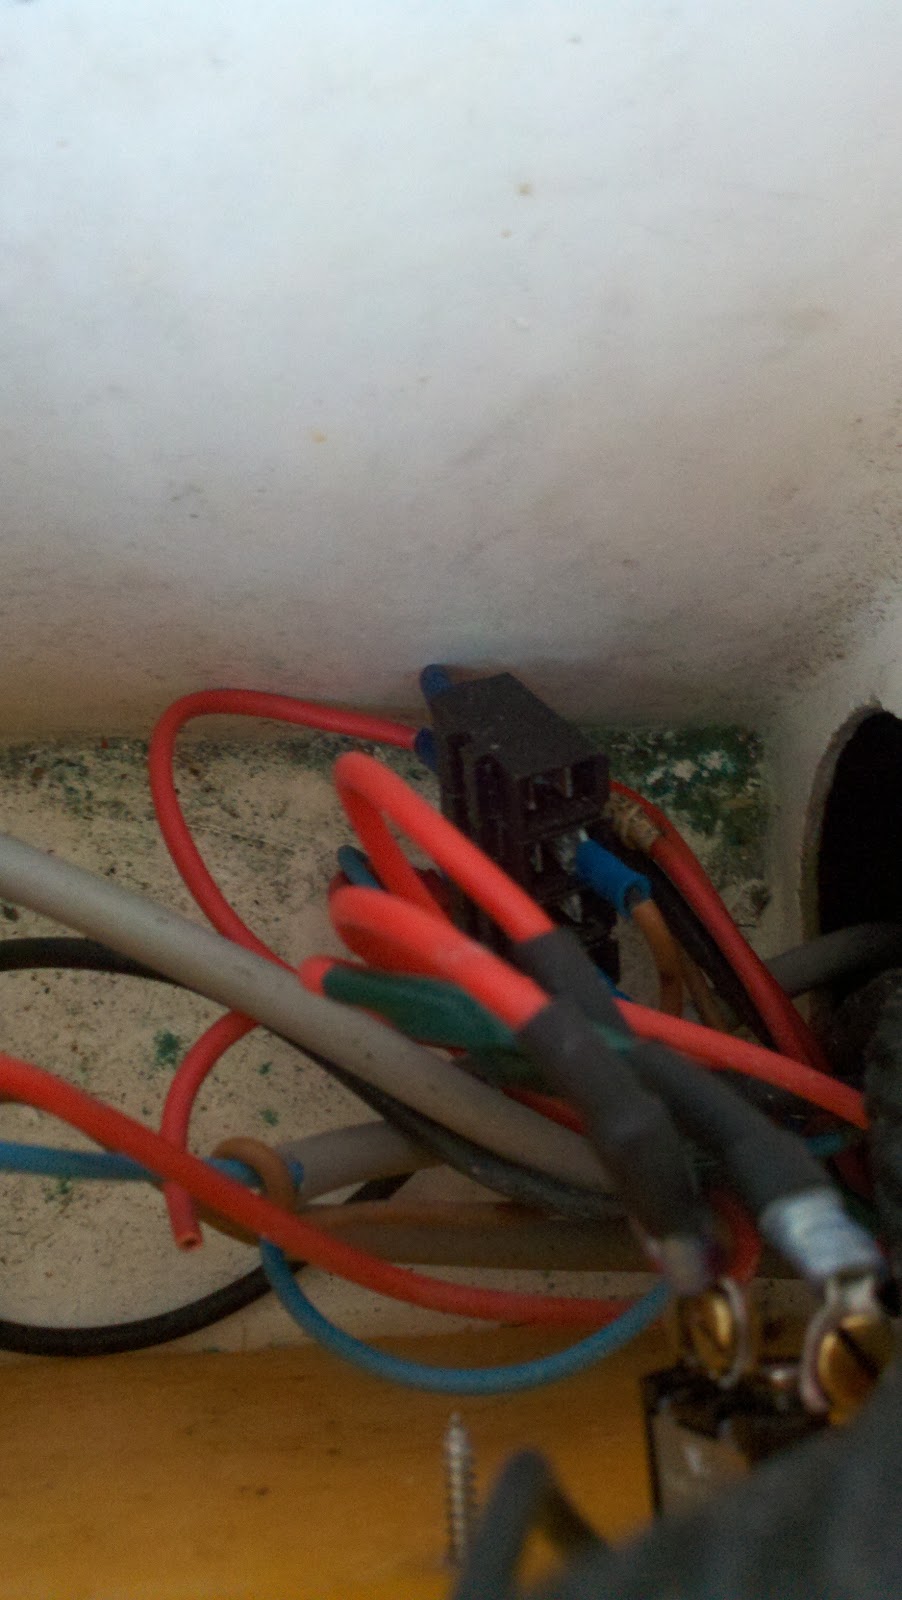
While waiting for the coatings to dry, I tore into the bilge pump and the hot water heater exchange loop.  God, what a pain that job was/is.  The wiring from the factory is great.  All of it running in it's own conduit and making sense.  Then there is the mess from the previous owner.
Now where is that ground to the float switch?!?

I could take pictures.  I tried even but I couldn't.  Just couldn't.  No sense in letting that abomination of wiring live any longer.  In real life or in cyberlife.  That and my tears made it hard to hold the camera. 

Who knew this cute little thing could cause me so much misery?
   Here is what was in Appa for a bilge pump-

Oh no, you didn't misread my price.  I am four hundred frickin' dollars!!  And I AM LOUD!!!

The manual says it is good for 480gph but my pump is pumping much slower than that.  Could it be the wiring?  No way.  On my boat?  Cast that thought aside.  The power for this 9lb behemoth ran from the panel (I think) to the float switch, then spliced into the original bilge wiring IN THE BILGE without any protective coating whatsoever.  The connection crumbled.  I won't even tell you about the ground.


I found three of these in the bilge.  They scampered away before I could get them!  I wonder what they eat?
 Why didn't I see this earlier?  You don't own a boat or you hire out to do your work for you, don't you?  Because it worked.  Barely but it worked.  Not like that is going to keep the boat afloat if a through hull failed anyway. 
The old pump is also located out of the bilge (a good thing) but takes up storage space (bad thing).  I decided to get rid of the old evil float switch and install that new RULE with the water sensor built in.  The wee little RULE turns itself on every 2.5 minutes for a brief moment and spins it's impeller.  If the impeller meets resistance, it stays on and pumps out the water.  If there is too much resistance from a heavy liquid such as oil, it won't pump.  I think it is brilliant.  Hope it doesn't make a bunch of noise when it does it's check though.
The little RULE is a 500 GPH pump and not meant to stop a huge ingress of water but only for minor clean ups in the bilge.  For emergencies, I'll have this installed


Or something like it.
Haven't really settled on any one pump.  But we will have an emergency pump along with TWO hand pumps (one above decks and the other below).  My engine will also be used as a pump.  I have a strainer for the intake and have a longer than needed intake hose that feeds the engine.  Liferaft.  I have that also.
The switch for the bilge pump is located under the nav station and under the windlass on/off selector.  The bilge pump switch ground ran from the switch up to the windlass panel and was connected to the on/off indicator light and then ran down to an unknown tangle of wires.  That tangle turned out to be the night light ground wire to the light.  Not a ground but a ground wire for the light.  There was no ground.  Yet the night light worked along with the indicator light on the windlass but the light on the RULE switch did not work.  I bought a combo positive/negative busbar and installed in by the fridge/freezer compressors.  I then chased everything down that I could (still some mystery wires) and grounded everything properly along with supplying good power to the busbar. 
The hoses for the hot water heater actually were not that bad to run.  I changed the fittings on the heater to 90° to help not bend the hoses so much.  I just have to flush the system out and it'll be done.  For now.


Wednesday, March 6, 2013

Working on the raceboat

Scott and I filled about 200 holes on Tremendous Slouch this past Monday.  We took all the hardware off the boat, everything, and overdrilled and then filled the holes with epoxy.  This was after we used hemostats to pull out the balsa around the holes.  Scott has a sweet deal where he gets to store the boat at the old Bayliner factory up north of Everett.  Spooky in there.  Empty.  Had a post apocalyptic feel to it.
Here are some pictures.


Note the 25 years of service plaques just left there.  


Butter I left out for Jen

Sweet old Sammy

Getting close

No pictures taken but on Friday, Jennifer, the kids and I hosted Graeme and Janna and their two kids on Appa.  We got to the dock at 430pm and took a look at the weather and decided to strip the cover off and go sailing.  By 5 we were out there.  A little blustery and Sammy started to act sick.  Fever and the like.  She rallied though and we were able to have a nice sail to Port Madison and then back to Shileshole. 
For those that don't know, Janna wrote the very entertaining Motion of the Ocean.  Once back in the slip after a 8-9 knot crossing of the Sound, we started to make pizzas and SB75s.  Again for those that don't know, SB75s are our offical boat drink.  SkyBison75 is the full name.  Rum with squeeze of lemon or lime mixed with grapefruit drink.  We like this one. 
 Graeme and Janna own Kotuku  and raced pretty much all last year.  They are getting ready to move abroad this summer in preparation to take the boat out on a cruise next year.  We picked their brains about the trials and tribulations of living on a small boat and cruising.  We had a great time.  That Kotuku is a cool boat.  They keep her just a couple slips away from us.
So on Sunday I was able to put a couple hours together, thanks to my wife, and I got a bunch done on Appa.  Here are the teak decks with the TeakGuard on them.  I still have to do the starboard side and the cabin top.  Couple of days and I will be done.  For now.


I think they look pretty good.  Especially when compared to last year at this time.


While taking Appa out on Friday the engine cranked over very slowly and almost seemed like it wouldn't start.  I thought it might be the wiring as the start battery is fairly new.  The wiring was undersized I thought and I was not impressed with its installation either.  There was a selector switch buried next to the start battery that would allow you to crank the engine over with the house bank, the start battery OR both.  Normally that is a fine arrangement except the wire running from the house bank to the battery selector was size #6 and had a run of 20 feet.  After the 20 foot run, it had to go through the selector and that would have some voltage drop and then it had to go another 15 feet to the starter.  Not 15 feet as a miniature crow would fly mind you.
So I got rid of the selector and the run from the house battery.  I figure if I need the house bank to start the engine, I'll have my heavy duty jumper cables to do it.  The start battery is separated from the starter by a big selector switch that cuts the ground to the starter.  Not sure why it is wired like this.  Might have something to do with the fact this engine does not have a ground UNTIL you press the start button.  Then it grounds itself and then the starter can work.  For sure there are some funky things going on with the boat electrically.  I'm going to have to ask people smarter than me about this. Anyway, as it stands now the start battery is hooked directly to the starter.  This is how it normally was anyhow as the selector switch was buried and I just left it selected to the start battery.  The engine started better than I have ever heard but it was warm out and that might have helped.  I'll try again this coming week after it has sat for a bit.  I will still increase the size of the positive and ground wires from the engine and try to decrease the run.
That is about it for now.